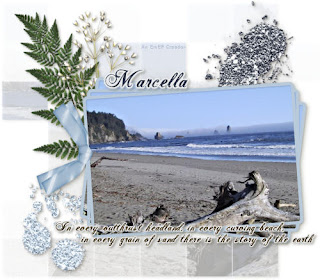
To make this tag exactly as my tutorial, you will need the scrapset, a photo or other image, Paint Shop Pro (I use 9.01, but I’m sure it’ll work in most versions) and Eye Candy 4000.
Open and minimize your supplies. Install your plug-in if you don’t already have it. You will need to close down PSP while you install, or it will not work.
The scrapset I used for this tutorial is made by Tanya and you can find it here. The font is called Radagund and you can find it here. The mask is by Vix and can be fond here.
Please read my TOU before you begin.
Open your supplies and minimize them. Open a new blank image, 50ox500 pixels size, white background.
Copy your photo and paste as new layer on your tag. Edit it to fit the whole tag.
Apply the mask VixMask294. Merge group.
With your raster deform tool, set the position X and Y to 0, then grab the lower right corner of the raster and drag the mask out to stretch over the whole tag.
Minimize the tag.
Open your photo and the frame. Copy the frame onto the photo as a new layer. Now adjust the photo to the frame, using the raster deform tool again.
When you have the photo framed to your liking, merge visible and copy.
Open your tag again and paste the framed photo as a new layer. Resize and position as you like.
Now add your embellishments and place them where you like them.
You may have to resize or tilt them before you are satisfied.
Now with your text tool, type out a nice saying, using the font Radagund in size 16 pixels. Convert to raster layer.
Add a nice gradient to the text using Eye Candy 4000 – Gradient glow.
Do the same with your name, only change the size to 36 pixels. Again add a gradient.
Now, starting from the layer just above your mask layer and working your way up, add a nice drop shadow to all the layers.
Add proper credits and your watermark/signature, and save as .jpg. Done!
Saturday, July 11, 2009
Friday, July 10, 2009
A Spot Of Colour
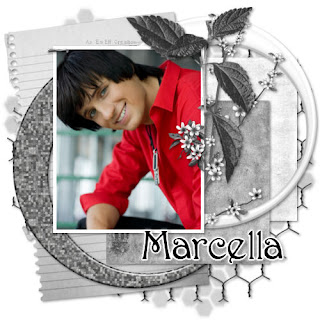
To make this tag exactly as my tutorial, you will need the scrapset, a photo or other image, Paint Shop Pro (I use 9.01, but I’m sure it’ll work in most versions) and Eye Candy 4000.
Open and minimize your supplies. Install your plug-in if you don’t already have it. You will need to close down PSP while you install, or it will not work.
The scrapset I used for this tutorial is made by Bel Vidotti and you can find it here.
Open and minimize your supplies. Install your plug-in if you don’t already have it. You will need to close down PSP while you install, or it will not work.
The scrapset I used for this tutorial is made by Bel Vidotti and you can find it here.
Please read my TOU before you start. The font is called Jessamine Script and you can find it here.
Let’s begin!
Open your supplies and minimize them. Open a new blank image, 500x500 pixels size.
Let’s begin!
Open your supplies and minimize them. Open a new blank image, 500x500 pixels size.
Select all, add a new layer. Copy your first paper and paste it into selection.
Add a new layer. Switch to your selection tool and go to the custom selection. Check the little box that says “use current selection as default”, and then change the settings to 150 for top + left and 350 for right + bottom. Copy your second paper and paste into the selection.
Add a new layer and copy and paste your third paper into the selection. De-select. Hide your smaller squares and highlight your firs (bottom) paper. Choose a nice mask for it.
Unhide your other layers again. Move your squares to your liking. Save and minimize for now.
Open your photo or image. Go to Image – Add borders, and give it a border of 5 to 8 pixels symmetrically. I made my border white, but you can of course choose any colour you like.
Copy the image. Open your tag again, and paste the photo as new layer. Move it to where you want it in the tag.
Copy the note paper and paste as new layer. Move it to just above the masked layer. Resize it, tilt it or move it around until you think it looks good.
Now copy and paste the wire mesh as a new layer on the tag. Move it below the note paper. Resize to your liking.
Now you can add other embellishments as you like. I added the two circles and the twigs of leves and flowers. For the twigs I had to do some cropping just where they are supposed to look like they are placed below the photo.
Switch to your text tool and write your name (or whichever name you want). Choose the Jessamine Script font and a nice size for the tag. Apply and convert to raster layer. Move the text to where you want it.
Go to Eye Candy 4000 – Gradient glow and add a nice gradient of your choice to the text.
Now go back to your mask layer. Apply a nice drop shadow to it. I chose R2, L2, Opacity 30, Blur 3 and colour black. Work your way through the rest of the layers and add a drop shadow to all of them. I chose a heavier shadow for the rest of the layers: R2, L2, Opacity 40, Blur 7 and colour black.
Hide the white background layer and choose your crop tool. Chose to crop merged opaque. Unhide your white bg again.
Make sure you add proper credits and your watermark/signature to the tag. Sav as .jpg and you’re all done!
Subscribe to:
Posts (Atom)