Saturday, July 11, 2009

The Story of The Earth

To make this tag exactly as my tutorial, you will need the scrapset, a photo or other image, Paint Shop Pro (I use 9.01, but I’m sure it’ll work in most versions) and Eye Candy 4000.
Open and minimize your supplies. Install your plug-in if you don’t already have it. You will need to close down PSP while you install, or it will not work.
The scrapset I used for this tutorial is made by Tanya and you can find it here. The font is called Radagund and you can find it here. The mask is by Vix and can be fond here.
Please read my TOU before you begin.

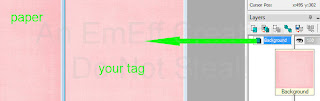
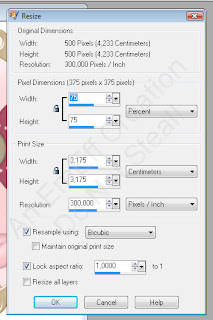
Open your supplies and minimize them. Open a new blank image, 50ox500 pixels size, white background.
Copy your photo and paste as new layer on your tag. Edit it to fit the whole tag.
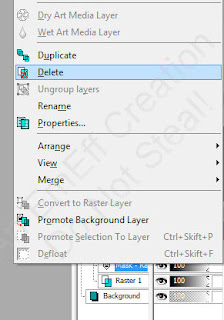
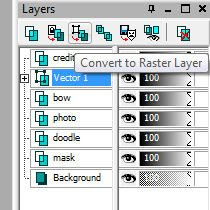
Apply the mask VixMask294. Merge group.
With your raster deform tool, set the position X and Y to 0, then grab the lower right corner of the raster and drag the mask out to stretch over the whole tag.

Minimize the tag.
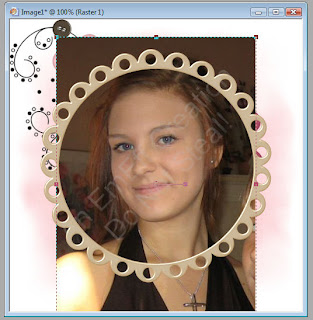
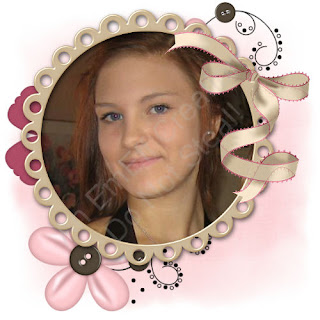
Open your photo and the frame. Copy the frame onto the photo as a new layer. Now adjust the photo to the frame, using the raster deform tool again.
When you have the photo framed to your liking, merge visible and copy.

Open your tag again and paste the framed photo as a new layer. Resize and position as you like.

Now add your embellishments and place them where you like them.
You may have to resize or tilt them before you are satisfied.

Now with your text tool, type out a nice saying, using the font Radagund in size 16 pixels. Convert to raster layer.
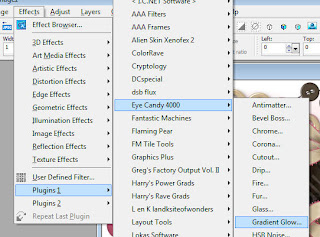
Add a nice gradient to the text using Eye Candy 4000 – Gradient glow.
Do the same with your name, only change the size to 36 pixels. Again add a gradient.

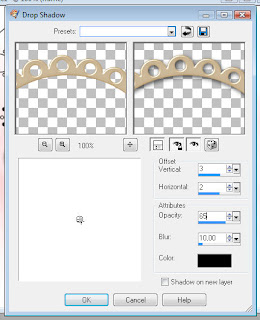
Now, starting from the layer just above your mask layer and working your way up, add a nice drop shadow to all the layers.

Add proper credits and your watermark/signature, and save as .jpg. Done!

Friday, July 10, 2009

A Spot Of Colour

To make this tag exactly as my tutorial, you will need the scrapset, a photo or other image, Paint Shop Pro (I use 9.01, but I’m sure it’ll work in most versions) and Eye Candy 4000.
Open and minimize your supplies. Install your plug-in if you don’t already have it. You will need to close down PSP while you install, or it will not work.
The scrapset I used for this tutorial is made by Bel Vidotti and you can find it here.

Please read my TOU before you start. The font is called Jessamine Script and you can find it here.

Let’s begin!

Open your supplies and minimize them. Open a new blank image, 500x500 pixels size.

Select all, add a new layer. Copy your first paper and paste it into selection.

Add a new layer. Switch to your selection tool and go to the custom selection. Check the little box that says “use current selection as default”, and then change the settings to 150 for top + left and 350 for right + bottom. Copy your second paper and paste into the selection.

Add a new layer and copy and paste your third paper into the selection. De-select. Hide your smaller squares and highlight your firs (bottom) paper. Choose a nice mask for it.

Unhide your other layers again. Move your squares to your liking. Save and minimize for now.

Open your photo or image. Go to Image – Add borders, and give it a border of 5 to 8 pixels symmetrically. I made my border white, but you can of course choose any colour you like.

Copy the image. Open your tag again, and paste the photo as new layer. Move it to where you want it in the tag.

Copy the note paper and paste as new layer. Move it to just above the masked layer. Resize it, tilt it or move it around until you think it looks good.
Now copy and paste the wire mesh as a new layer on the tag. Move it below the note paper. Resize to your liking.

Now you can add other embellishments as you like. I added the two circles and the twigs of leves and flowers. For the twigs I had to do some cropping just where they are supposed to look like they are placed below the photo.

Switch to your text tool and write your name (or whichever name you want). Choose the Jessamine Script font and a nice size for the tag. Apply and convert to raster layer. Move the text to where you want it.

Go to Eye Candy 4000 – Gradient glow and add a nice gradient of your choice to the text.

Now go back to your mask layer. Apply a nice drop shadow to it. I chose R2, L2, Opacity 30, Blur 3 and colour black. Work your way through the rest of the layers and add a drop shadow to all of them. I chose a heavier shadow for the rest of the layers: R2, L2, Opacity 40, Blur 7 and colour black.

Hide the white background layer and choose your crop tool. Chose to crop merged opaque. Unhide your white bg again.

Make sure you add proper credits and your watermark/signature to the tag. Sav as .jpg and you’re all done!

Monday, June 22, 2009

Summer Holiday Tag

To make this tag, you will need the scrapkit called Festival. You can get it at Shabby Princess, and it is FTU. You will also need a nice photo or other picture. Please read my and their TOU before you start.

Open your supplies and minimize them. Open a new image 400x400 pixels, white background.

Copy one of the papers as a new layer onto your tag. Apply a nice mask of your choice and merge group.
Add a new layer. Take your selection tool and draw out a rectangle horizontally. Fill the selection with a paper.
Add a new layer. Now draw out another selection, this time more narrow, like a stripe, also horizontally. Fill with a paper. Repeat this for another “stripe”.

New layer – draw a vertical rectangle this time but otherwise do as before.
Copy the journaltag onto your tag and position it where you like it.
Minimize your tag for now.

Open your photo. Copy the shabby frame/edges onto the photo and adjust it so that you have the part of the photo you want inside the frame. With your magic wand, select the part outside the frame, expand the selection 1 pixel, highlight your photo layer and hit delete. Deselect. You should now have only the frame and the part of the photo inside of the frame. Merge.
Copy this image.

Go back to your tag, paste the framed photo onto the tag. Adjust it to your liking.

Now add embellishments of your liking.
Apply a nice drop shadow to each of the layers, except for the mask layer.
With your text tool, write out a nice text or saying, and apply it to the journaltag. (I played with the settings of the leading to make it look like it’s written on the lines.)

Again wit your text tool, write out your name in a nice script font, use a rather large size and choose one of the papers as fill. Convert to raster layer. Selections – select all – float – defloat. Expand your selection 2 pixels. Add a new layer and move it below your name layer. Fill the new layer with a color that compliments your textfill. Deselect and merge your name layer into the recently filled layer, and you have just given your name a nice “frame”. Add a drop shadow.

Almost done, we only need to put proper credits to our tag, and save it as .jpg.

Inspiration Tag

To make this tag, you will need scrap papers, a photo frame, 2 photos or other images, Paint Shop Pro (I use 9.01, but I’m sure it’ll work in most versions).
Open and minimize your supplies.

Open a new image 400x400, white background. Copy the notepaper, paste on your image. If you wish to mask it, do so. I chose not to.
Add a new layer. Take your selection tool and draw out a rectangle somewhere in the middle of the image. Fill the rectangle with one of the scrap papers. Deselect.
Repeat this to get another rectangle. (See my tag for guidance)
Apply a drop shadow of your choice to the rectangles.

Now take your first image and your photo frame. Fit the frame to the photo and merge. Copy and paste on to your image. Resize to your liking.
Repeat with your second picture and resize and rotate to your liking.
Add the same drop shadow as before to the photos.

Apply some nice brushes to your tag. If you want the brushes to stand out more, you can add a slight drop shadow to them.

Either with your text tool or with a nice brush, add a saying or something like that to your tag. Add a drop shadow to it.
Back to your text tool. Apply your name on the tag and add a drop shadow to it as well.

Don’t forget to put proper credits to your tag. Hide the white bg and crop it to get rid of excess space. Unhide the white bg and save as .jpg.
That’s it!

***

I made an animated version of this tag, too.
It’s a bit more complicated, but follow me and I’ll try to explain the procedure.

When you have done everything except the saying, hit ctrl+shift+c (copy merged) and paste the image in Animation Shop.
Open your animated image that you want to use. Try to choose one with not too many frames! Mark all and export to PSP.

In PSP, add the photo frame to your animation. You will need to copy the frame several times and merge each layer separately. It’s very time consuming, but worth the time.
When you have all the layers of the animation with a frame, close the animation. You will be asked to save the animation, click no, the you will be asked to update back to AS, click yes.

Back in AS, you now have the updated animation. You will need to resize the animation if it is a big one, so it fits your tag.

Now copy your tag until you have equal amount of frames of it as your animation has.
Mark the propagate paste-button. Highlight all frames of both your tag and of your animation.
Drag the first image of your animation onto the first image of your tag, to where you want to place it. Wait for it – and there you have the animation pasted into your tag!

If you want a saying or other stuff added to the tag, that floats onto the animation, then just copy them from PSP, and paste them onto the tag.

Not very hard, but you may need to practice a few times.

Here’s how my animated tag turned out.

Friday, June 12, 2009

A Love Story

This tag is made in Paint Shop Pro 9, but will probably work in any version
It is my own idea, and any resemblance to other tuts is purely coincidental.
To make this tag you need the B/W scrap kit from Pipmp’d Designz here and my supplies.
Please read my and their TOU before you start.
You will also need EyeCandy 4000 – Gradient Glow.

Open all your supplies and minimize.
Open a new image 500x500, white background.
Open the frame and with you magic wand, select the shadows of the frame. Delete them. Deselect. Resize 75% using smartsize and copy the frame to your image.

Duplicate the frame and hide the upper frame.
With your magic wand, select the three frames inside, expand selection by 2.
Copy the supplied pictures to your image and position them inside the selections. Invert selection, delete excess.
Hide your background layer and merge visible. Unhide background layer and hide the merged layer.

Unhide your upper frame. Repeat the same procedure with this frame and the rest of the supplied pictures.
Unhide your lower layer. Rotate the lower frame layer 5 degrees to the right. And the upper frame layer 5 degrees to the left.

Copy the branch element to the tag. Resize to preferred size. Position it as you like, you may need to erase parts of the branch. Do the same with the other elements you chose.

Add the brushtext as a new layer above your background.
Apply a nice mask to this layer, merge group.

Open your text tool. Write The Twilight Saga with the font Zephyr, colour 404040 and 30pts.
Center the text and convert to raster layer. Again with the same font and colour, but with size 16 pts, type – a love story. Convert this layer to raster and position it to the first textlayer as shown in my tag. Merge the two layers.
Apply Gradient glow in white to the text layer. Use a setting you like.

Repeat these steps to apply your name to the tag, but swap the colours.

Apply a drop shadow to each of your layers – 1,1,30,4, black to all the elements, and 2,2,50, 5, black to the frames and those you typed.

When the tag is finished, hide your background layer and crop the tag to get rid of excess space. Unhide the background layer and save as JPG.

Don’t forget to add credits and watermark to your tag.

Thursday, April 23, 2009

Wolf Shaped


To make this tutorial look like my tag, you will need the scrapset, the tube, font and the photo, Paint Shop Pro (I use 9.01, but I’m sure it’ll work in most versions) and Eye Candy 4000.
Open and minimize your supplies. Install your plug-in if you don’t already have it. You will need to close down PSP while you install, or it will not work.
The scrapset I used for this tutorial is a FTU kit, made by Urban Fairytales and you can find it here. Please do not share the scrapset further, but instead share the link to UF, so that more people can enjoy their wonderful work! Please read my and their TOU before you start.


This tutorial is strictly a text tutorial, so you may need to go back and look at the finished tag now and then. I made this tag and wrote this tut on April 23rd, 2009. Any similarity to other tags and tuts are purely coincidental.
Let’s begin!


Open a new image, 500x500 pixels, white background.
Copy your photo and paste as new layer.
Highlight your background, select all.


Contract selection by 125 pixels. Move the photo around until you have the part of it you want to use inside the selection, invert selection. Make sure your photo layer is highlighted and hit delete. De-select.
With your photo layer still active, select all-float selection-defloat. Add a new layer. Choose two colours for your frame, fill your colours with the first, contract selection by 5, fill with the other colour, contract by 2, fill again with the first colour, contract by 3. Delete. De-select. Now you have a frame.


Open your tube of Jacob. Resize it by 21% smart size. Copy the tube and paste as new layer. Resize the tube again, this time by 40%. Place it where you want it on the tag.


Copy one of the wolf tubes and paste as new layer. Place it in between your photo and your Jacob-tube. Duplicate and merge the duplicated layer into the original layer.


Close out your background layer and merge visible. Open your layers again. Add a drop shadow to the photo layer. I used V2-H2-opacity 60-blur 5-colour black.


Copy the map and paste as new layer. Move to just above your background.


Copy one of the text tubes. Place it above your map layer and position it where you like. Add a drop shadow of V1-H1-opacity 30-blur 5-colour black.


Copy the butterflies tube add as new layer. Resize it 25% and position it. Add the same shadow as the text layer.


Time to add names. Open your font file -Almagro Regular - and minimize it. With your text tool set to vector, antialias to sharp and size to 20, type in the name Jacob Black. Convert to raster file. Rotate the layer 90 degrees left and position it.


Go to Effects-Plugins-Eye Candy 4000-Gradient Glow. Pick a light colour and set it to width 5/corners 25/opacity 100. Place a second colour box above the dropper tool and set the transition dot there too.
Add a drop shadow of V2-H2-opacity 60-blur 5-colour black.


Do the same with your name, except for the rotation part. Add the same shadow as before.
Add watermark and copyright info. Close out your background and crop using the merged opaque. Save as .jpg. Your tag is done!


I hope you enjoyed this tutorial.

Thursday, April 16, 2009

Doodle Girl

To make this tag exactly as my tutorial, you will need the scrapset, a photo or other image, Paint Shop Pro (I use 9.01, but I’m sure it’ll work in most versions) and Eye Candy 4000.
Open and minimize your supplies. (You will need at least 2 papers, a doodle and a frame)
Install your plug-in if you don’t already have it. (You will need to close down PSP while you install, or it will not work. )
The scrapset I used for this tutorial is called Sweet Nothings, and is made by the talented Wanda at Bluedream Designs and you can find it here. It is FTU, but please do not share it, share the link to her blog instead!! Please read my and their TOU before you start.
The photo is my own. Font is 2Peas Tattered Lace, which is a pay font, so I cannot supply it for you.

Let’s begin!

Open a new image, 500x500 pixels, white background.
Maximise your first paper and drag it to your image.
(Simply grab the layer you want to copy with your cursor and drag the cursor onto the blank image.)

Apply a nice mask of your own choice. Then right click your mask layer and delete it. Click yes in the box that appears. Merge group.
Open your doodle and drag it onto your image (like you did with the paper).
With your raster deform tool, position the doodle along the left and upper edges of the image.
Then change the size of the doodle by increasing or decreasing the scale until the “handle”s of the doodle are close to the right and lower edges of the image.

Open your frame, drag onto image, resize it to 75% with these settings
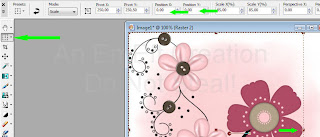
Highlight the layer below your frame
Choose a nice photo or another picture of your choice. I chose a photo of my daughter.
Drag the photo onto the image. It should now be inbetween the frame and the doodle.
Using the raster deform tool again, position and resize the photo to fit the frame.

With your magic wand set to 0 tolerance, click inside the frame. Expand the selection by 5 pixels. Invert the selection, highlight the photo layer and hit delete. Deselect.
You should now have only the part of the photo that is within the frame
Give your frame a drop shadow

Merge your frame layer down into your photo layer.

Position the doodle and the photo layer as you would like them.
Open your bow and drag onto the image. Place it where you want it. You may need to resize it. If you want more accents, place them as you like.
When you are satisfied with the placings of your layers, add a drop shadow to each layer – except for the mask layer! – I used the same drop shadow all over the tag.Your tag should now look something like this. (I chose to mirror my doodle and to resize my bow 75% twice
Now it’s time to put your name on the tag.
This is where the second scrap paper comes in use. Set your foreground colour to null, your background colour to pattern, choose the paper.
Now type the name you want on the tag. I used these settings.

Convert to raster layer.

Go to effects-plugins-eye candy 4000-gradient glow
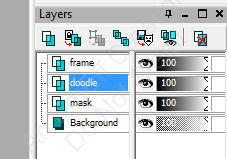
Choose a colour from your tag for the gradient and apply these settings to your text

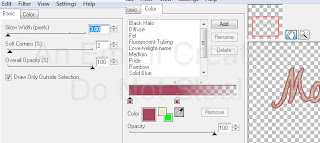
Position your name where you like it, give it the same drop shadow as before, and you’re done!
Save your tag as .jpg. Don’t forget to add proper credits for artists of images you may have used!I hope you liked my first tutorial!